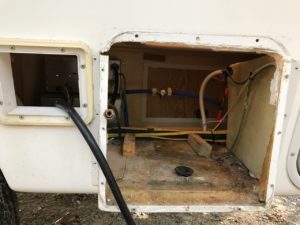
Why start off simple? Our first project was also the most difficult.
When we purchased our Casita, the water heater was disconnected by the prior owner due to a leak.
The old heater had a pilot light that needed to be lit outside. This was the perfect opportunity to upgrade to a digital ignition model with an electric heating element. Digital ignition lets us flip a switch from inside the camper to light the propane heater. The electric element heats water if we’re plugged into power at a campsite.
Tip: You can run both propane and electric at the same time. Useful for when the kids use up all the hot water.
I ordered the Suburban SW6DE along with a new door, illuminated switch, and a pair of bronze check valves.
PEX– is a type of plastic plumbing that uses special fittings and a copper “crush ring” to create a seal. It’s cheaper and faster to install compared to copper and is more tolerant to freezing.
To work on PEX plumbing, I bought a Sharkbite crimper, PEX ring removal tool, 1/2″ copper crimp rings and 10′ pieces of blue and red pipe.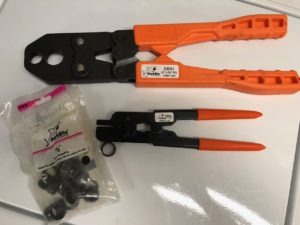
Diving in: To gain access, the dinette bench gets unscrewed and pulled out. The electric panel was too much work to take out, so I cut the zip ties holding the power wires in order to get enough slack to swivel the bench out of the way. Next was to make sure the propane was turned off and the gas line disconnected. On the outside, the water heater door was removed and rivets drilled out. With a lot of careful carpet knife work, all the caulking was cut through inside and out and the water heater finally came out with some wiggling and tugging.
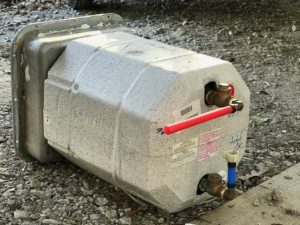
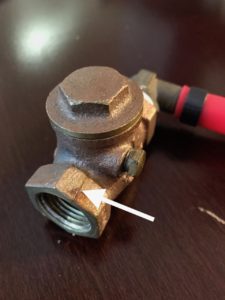
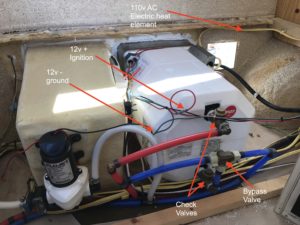
Now that the heater was out, I found the source of the original water leak! The upper check valve was cracked. Probably from over-tightening. I replaced both check valves. Their purpose is to keep the hot water from back-flowing into the cold water side.
Warning! The next 3 paragraphs contain technical mumbo jumbo. For the short version, scroll down to the quote.
The new heater slid into place, the gas line was re-installed and the water lines hooked back up with new pieces of PEX tubing and new crimp rings. As for wiring, the Casita already had a circuit breaker dedicated to the 110v circuit labeled “water heater”. All that needed to be done was to wire the heater to the circuit breaker. The digital ignition for the propane side required a 12 volt DC circuit. I grabbed a 12 volt circuit off the DC side of the fuse panel and ran that to the new lighted Suburban switch. The ground was tied into the water pump ground. I mounted the 12 volt switch to the front of the dinette bench after cutting out the required size hole.
To finish the install, I used a whole lot of RV sealant on both sides of the water heater . The new door was riveted into place and caulked.
Before putting the bench back in, I hooked the camper up to city water and pressurized the system. To my suprise the check valve started dripping! Good thing I had extra PEX parts. I cut off the ring, a bit of tubing, and carefully tightened the check valve a full turn. It was really tight, and when pressure tested it held up!
While this project isn’t for the faint of heart, having electrically heated water and digital ignition was well worth the time, effort, and cost.
Key points (for those who scrolled down): New heater installed, wired, plumbed, and sealed up! Now we have hot water with the flip of either a switch (propane) or a circuit breaker (electric).


9 comments
Why did you order a new water heater, but in your description, you repaired the old one? I’m confused.
I did replace the old unit with the updated one because of digital ignition and electric heating element. The “repair” was the cracked check valve, so in theory I could have just put the old one back, nothing was wrong with it. However I didn’t like going outside to light the pilot when I wanted hot water.
One day soon I’ll be changing mine. I’ve found only a few, not very detailed, instructions online and I think they all mentioned removing the bench. I’m a plumber, so the plumbing’s no issue, but I can’t see a reason why the bench should have to come out. Why does it need to be removed? I have a 2003 Casita spirit deluxe that already has the electronic ignition version water heater. I’ll be replacing like for like and there are access hatches above & behind the water heater.
You can get the heater out, but I don’t see how you’ll get a caulking gun in there to seal it up from the inside. For me I didn’t remove the bench, but pivoted it out of the way for easier access.
Thanks for your quick responses!
What size are the bronze check valves? 1/2″? Just want to make sure before I order on Amazon.
Also, 1/2″ PEX?
Thanks
Yes, everything is 1/2″. I bought these check valves: https://www.amazon.com/gp/product/B00MA9EPKA
Sorry to bug you again. When I click on the link for the illuminated switch, it takes me to a switch that is for a tankless water heater. Is that right? Thanks for your help!
Same switch, it’ll work.
Would the DEL be a better option? I’d like to be able to start it up from inside the camper.